

Deploying and Monitoring DataRobot Models in Azure Kubernetes Services
This post was originally part of the DataRobot Community. Visit now to browse discussions and ask questions about DataRobot, AI Platform, data science, and more.
In previous tutorials (such as this and this), we discussed not only how easy it is to manage and host models within DataRobot MLOps, but also how you can easily monitor any type of model that runs outside of DataRobot MLOps using a Spark environment, as an example.
This tutorial discusses Kubernetes, another very popular deployment architecture. More specifically, it explains how to deploy ML models on Azure Kubernetes Services (AKS) for production scoring pipelines with DataRobot’s MLOps portable prediction server (PPS).

DataRobot Automated Machine Learning already provides a dedicated prediction server which provides a low-latency, synchronous REST API suitable for real-time predictions.
Simply put, DataRobot MLOps PPS is an extension of this functionality that serves the ML model in a container image and thus gives customers full portability and control over their ML model and deployment architecture.
Because a PPS is containerized, it is very easy to deploy to a Kubernetes cluster and allows customers to take advantage of Kubernetes native support of auto-scaling and high availability. This makes the combination of PPS and Kubernetes very attractive for very volatile, irregular workloads like those you will often find with IoT use cases.
1) Create a Model
In this particular use case, we will use our public LendingClub dataset to predict the loan amount for each application. You can download the dataset here.
Because we are using DataRobot AutoML, our model is just a few clicks away.
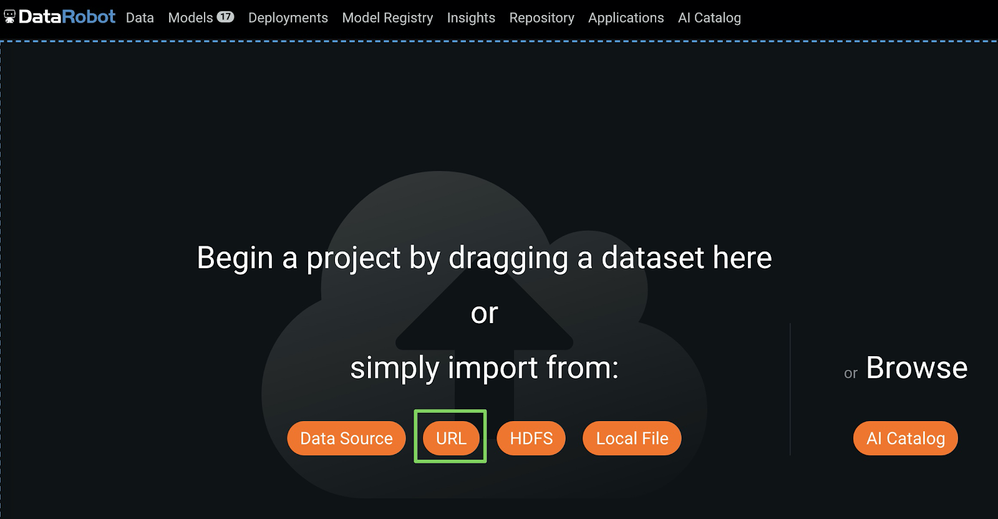
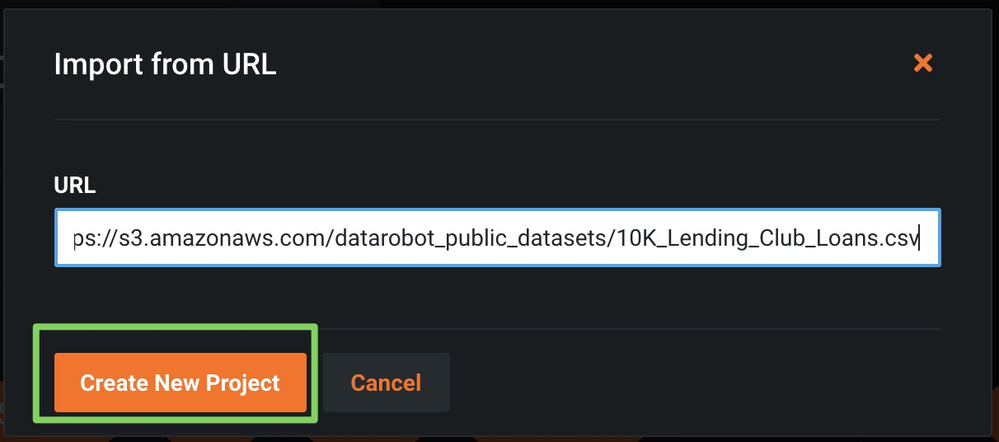
1. Drop the training data into DataRobot
Select URL as the import and then paste the above URL as shown below.
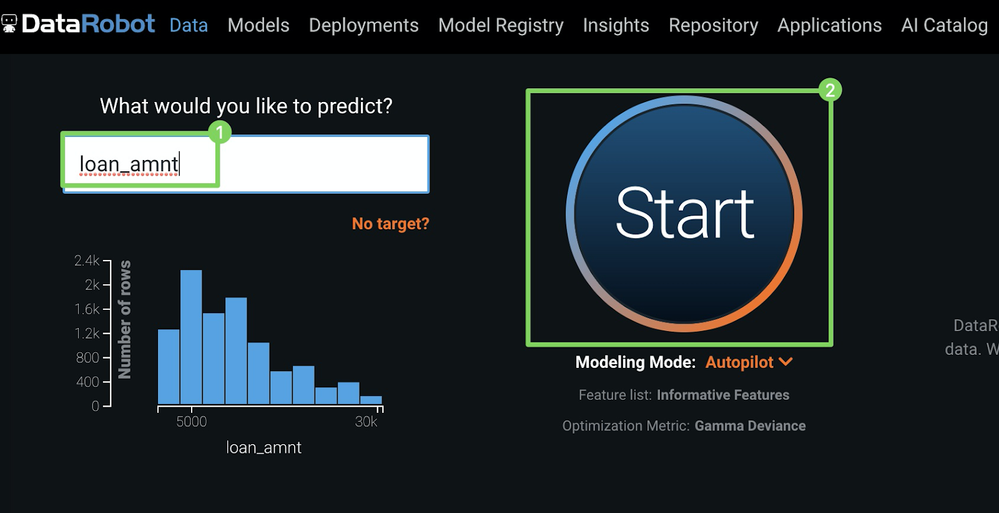
2. Select the target & click Start to start model building
Specify the loan_amnt column as target, and then click Start to kick off model building.
3. Download mlpkg file
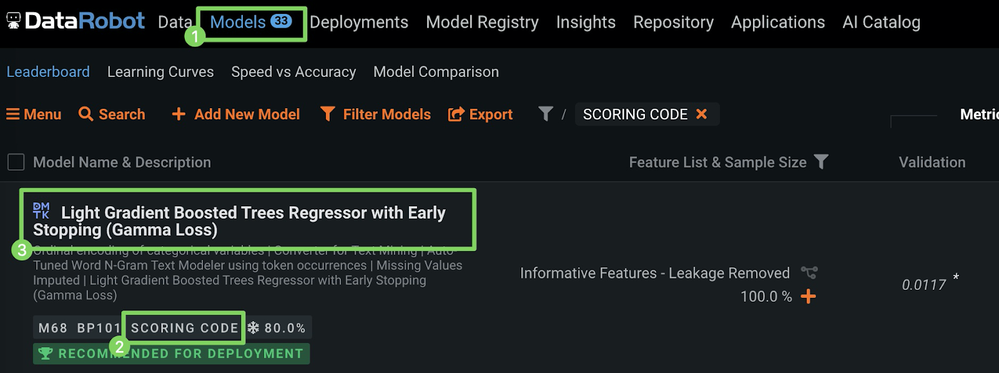
a. Once model building is complete, click the Models menu and select a model from the top of the Leaderboard.
b. Navigate to Predict > Downloads to get to the MLOps package (.mlpkg file) download screen as shown below.
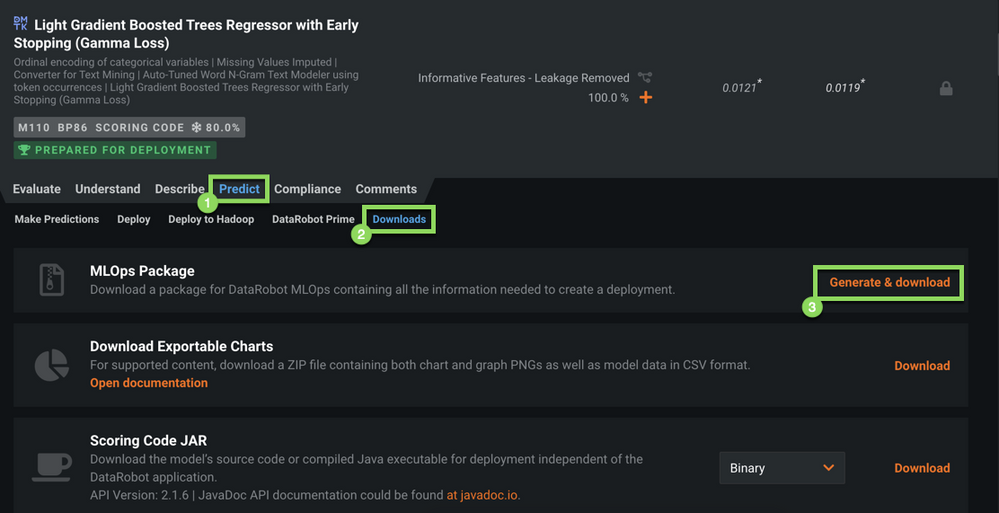
c. Click Generate & Download. This will start the download of the .mlpkg file.
See the Platform Documentation for Portable Prediction Server for further information.
2) Create image with .mlpkg file
(If you need more information on how to access the portable prediction server (PPS) base image, contact Support.)
Once you have the PPS base image, create a new version of it by creating a Dockerfile with the below content.

For the above COPY command to work, you need to have the .mlpkg file in the same directory as the Dockerfile. After creating your Dockerfile, you can simply run the below command to create a new image that includes the model.
docker build --tag regressionmodel:latest .3) Create Azure Container Registry (ACR)
Before we can deploy our image to AKS, we need to push it to a container registry such as ACR. Therefore we will first create an Azure Container Registry (ACR) from where we will push images for deployment.
In the Azure Portal, select + Create a resource > Containers, then click Container Registry.
On the Create container registry blade, enter the following:
- Registry name: “aisuccesseng” (choose a suitable name)
- Subscription: Choose your subscription
- Resource group: Use your existing resource group
- Location: Choose the region
- Admin user: Enable
- SKU: Standard
Then, click Create.
Navigate to your newly generated registry and select Access Keys. Take note of the admin password—we will use it later when we will authenticate from Docker to push our image from the previous step to this registry (Step 4. Push new image to ACR).

4) Push new image to ACR
To push our new image to Azure Container Registry (ACR), we first have to log in (replace aisuccesseng with your previously selected repository name).
docker login aisuccesseng.azurecr.ioThe password is the admin password that we created previously (Step 3. Create Azure Container Registry (ACR)).
Once logged in, ensure that your image is tagged properly and then push it to the repo as shown below.
docker tag regressionmodel aisuccesseng.azurecr.io/regressionmodel
docker push aisuccesseng.azurecr.io/regressionmodel
5) Create Azure Kubernetes Services (AKS) cluster
This tutorial assumes that you are familiar with AKS as well as Azure’s CLI. For further information, refer to Microsoft’s Quickstart tutorial.
If you don’t have a running AKS cluster, create one as shown below.
RESOURCE_GROUP=ai_success_eng
CLUSTER_NAME=AIEngineeringDemo

az aks create \
--resource-group $RESOURCE_GROUP \
--name $CLUSTER_NAME \
-s Standard_B2s \
--node-count 1 \
--generate-ssh-keys \
--service-principal XXXXXX \
--client-secret XXXX \
--enable-cluster-autoscaler \
--min-count 1 \
--max-count 2
Next, we create a secret Docker registry so that AKS can pull images from our private repository.
kubectl create secret docker-registry <SECRET_NAME> --docker-server=
<YOUR_REPOSITORY_NAME>.azurecr.io --docker-username=aisuccesseng --docker-password=
<YOUR_SECRET_ADMIN_PW>
Now we are ready to deploy our portable prediction server image. There are many ways to deploy applications, but probably the easiest one is via the Kubernetes dashboard. So let’s go ahead and start the Kubernetes dashboard.
az aks browse --resource-group $RESOURCE_GROUP --name $CLUSTER_NAME6) Deploy model to AKS
To install the PPS, we select Create, then Create an App.
In this screen, you specify: the app name (e.g., portablepredictionserver) the container image
(aisuccesseng.azurecr.io/regressionmodel:latest), number of pods (1), type of service (external), port mapping for PPS’s default port (8080), the previously created Docker pull secret, and the minimum CPU and memory requirements.
Then, click Deploy.

This will take a couple of minutes, but that’s it—we just installed the portable prediction server.
7) Score predictions
To test the model, you can download the Postman collection from here, and update the hostname from localhost to the external IP address that was assigned to your service. You can find the IP address in the Services tab in your Kubernetes dashboard as shown below.

To make a prediction, execute the make predictions request as shown below.

Autoscaling and high availability
Kubernetes supports horizontal pod autoscaling to adjust the number of pods in a deployment depending on CPU utilization or other selected metrics. The Metrics Server is used to provide resource utilization to Kubernetes, and is automatically deployed in AKS clusters.
So far we have deployed one pod for our service and defined only the minimum requirement for CPU and memory resources.
To use the autoscaler, we need to define CPU requests and utilization limits.
By default the portable prediction server spins up one worker which means it can handle only one HTTP request simultaneously. The number of workers you can run, and thus the number of HTTP requests that it can handle simultaneously, is tied to the number of CPU cores available for the container.
Because we set the minimum CPU requirement to 1, we can set the limit to 2 as shown in the below patchSpec.yaml file:
apiVersion: apps/v1
kind: Deployment
metadata:
  name: portablepredictionserver
spec:
  selector:
    matchLabels:
      app: portablepredictionserver
  replicas: 1
  template:
    metadata:
      labels:
        app: portablepredictionserver
    spec:
      containers:
      - name: portablepredictionserver
        image: aisuccesseng.azurecr.io/regressionmodel:latest
        ports:
        - containerPort: 8080
        resources:
          requests:
            cpu: 1000m
          limits:
            cpu: 2000m
      imagePullSecrets:
      - name: aisuccesseng
And then run the below command:
kubectl patch deployment portablepredictionserver --patch "$(cat patchSpec.yaml)"Alternatively, you can update the deployment directly in the Kubernetes dashboard by editing the JSON as shown below and then click UPDATE.

Now that we defined the CPU limits, we can configure autoscaling with the below command to autoscale the number of pods in the “portablepredictionserver” deployment. If the average CPU utilization across all pods exceeds 50% of their requested usage, the autoscaler increases the pods from a minimum of 1 instance up to a maximum of 10 instances.
kubectl autoscale deployment portablepredictionserver --cpu-percent=50 --min=1 --max=10To run an actual load test, you can download this sample JMeter test plan from here, update the URLs/ authentication, and run it with the below command.
jmeter -n -t LoadTesting.jmx -l results.csvThe output will look similar to the below example.

9) Report Usage to DataRobot MLOps via Monitoring Agents
Finally, even though we deployed our model to AKS, we still want to monitor this model along with all of our other models in one central dashboard. Therefore we are going to report all the telemetrics around these predictions to our DataRobot MLOps server and dashboards.
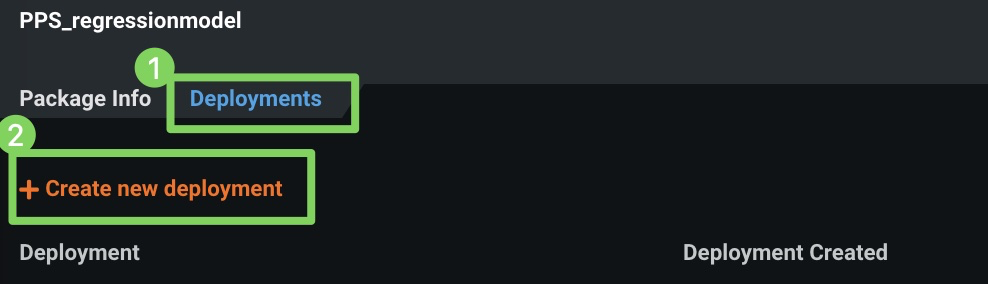
1. Create external deployment
a. Before we can report scoring details, we have to create an external deployment within DataRobot MLOps. This only has to be done once, and can be done via the UI in DataRobot MLOps as shown below.
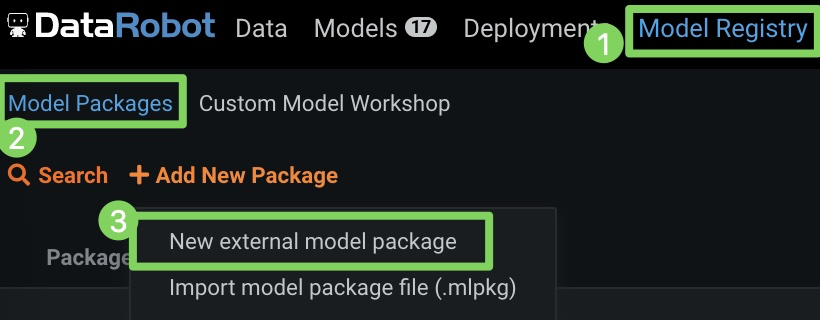
b. Click Model Registry > Model Packages and then select New external model package from the dropdown menu.
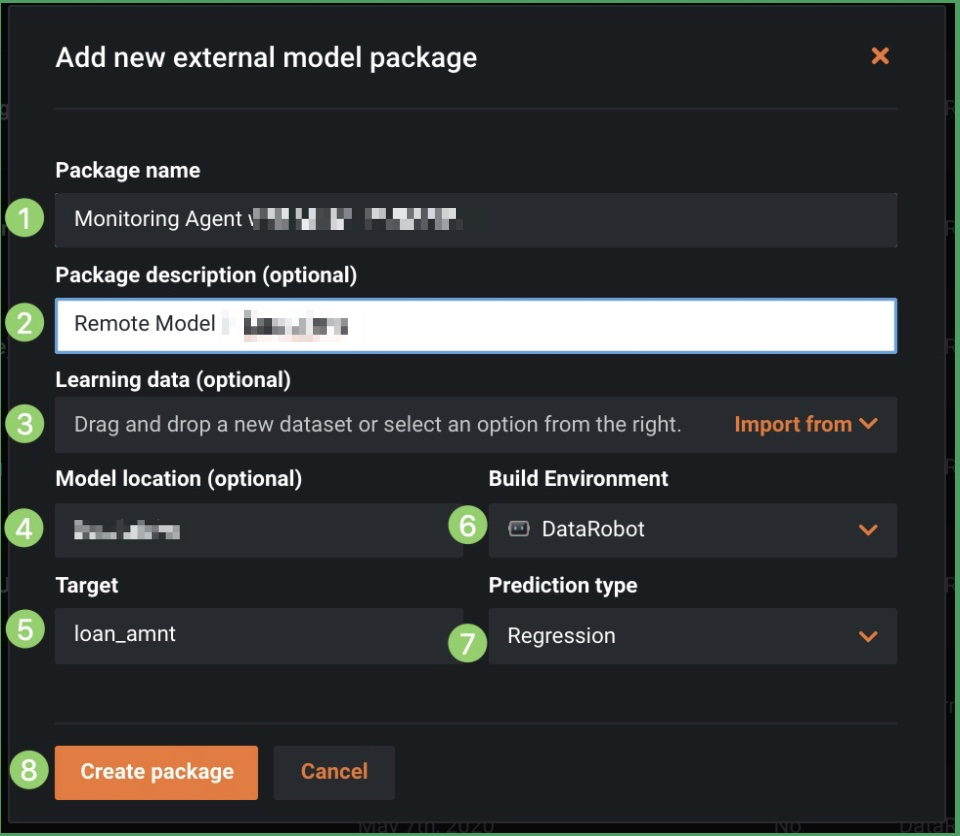
c. Specify a package name and description, upload the corresponding training data for drift tracking, and identify the model location and environment, target, and prediction type.
d. Then, click Create package.
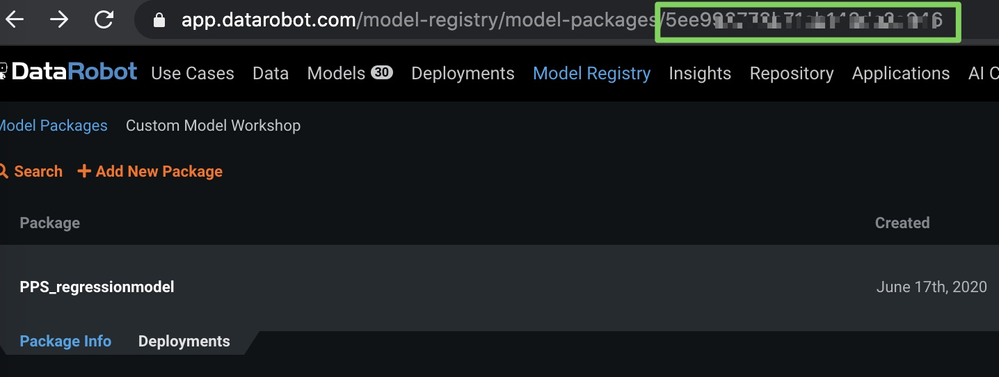
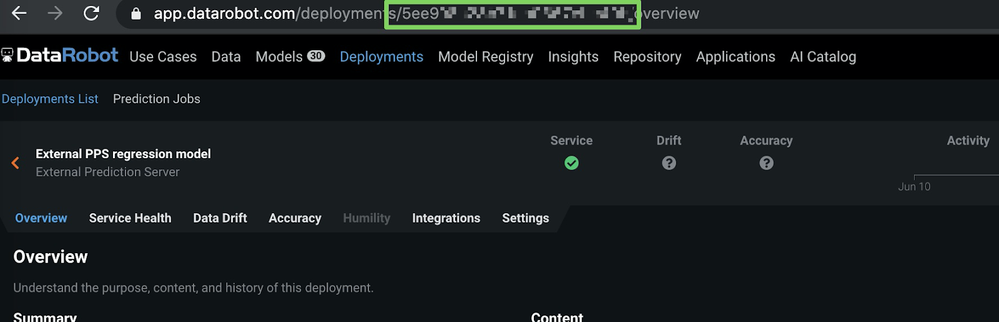
e. Once the external model package is created, take note of the model ID in the URL as shown below (blurred in the image for security purposes).
f. Next, select the Deployments tab and click Create new deployment.
Once the deployment is created, the deployment Overview page is shown. From here you can get the deployment ID.
Now that we have our model ID and deployment ID, we can finalize the configuration of our portable prediction server in the next step.
2. Report prediction details
To actually report prediction details to DataRobot, we just need to provide a few environment variables to our portable prediction server container.
Similar to before, we just update the deployment directly in the Kubernetes dashboard by editing the JSON as shown below and then clicking UPDATE.
"env": [
             {
                "name": "PORTABLE_PREDICTION_API_WORKERS_NUMBER",
                "value": "2"
              },
              {
                "name": "PORTABLE_PREDICTION_API_MONITORING_ACTIVE",
                "value": "True"
              },
              {
                "name": "PORTABLE_PREDICTION_API_MONITORING_SETTINGS",
                "value": "output_type=output_dir;path=/tmp;max_files=50;file_max_size=10240000;
model_id=<modelId>;deployment_id=<deployment_id>"
              },
              {
                "name": "MONITORING_AGENT",
                "value": "False"
              },
              {
                "name": "MONITORING_AGENT_DATAROBOT_APP_URL",
                "value": "https://app.datarobot.com/"
              },
              {
                "name": "MONITORING_AGENT_DATAROBOT_APP_TOKEN",
                "value": "<YOUR TOKEN>"
              }
Final thoughts
Even though we deployed a model outside of DataRobot on a Kubernetes cluster (AKS), we can monitor it like any other model and track service health and data drift in one central dashboard (see below).

More information
Check the DataRobot Documentation for more information:
DataRobot is the leader in Value-Driven AI – a unique and collaborative approach to AI that combines our open AI platform, deep AI expertise and broad use-case implementation to improve how customers run, grow and optimize their business. The DataRobot AI Platform is the only complete AI lifecycle platform that interoperates with your existing investments in data, applications and business processes, and can be deployed on-prem or in any cloud environment. DataRobot and our partners have a decade of world-class AI expertise collaborating with AI teams (data scientists, business and IT), removing common blockers and developing best practices to successfully navigate projects that result in faster time to value, increased revenue and reduced costs. DataRobot customers include 40% of the Fortune 50, 8 of top 10 US banks, 7 of the top 10 pharmaceutical companies, 7 of the top 10 telcos, 5 of top 10 global manufacturers.
-
How to Choose the Right LLM for Your Use Case
April 18, 2024· 7 min read -
Belong @ DataRobot: Celebrating 2024 Women’s History Month with DataRobot AI Legends
March 28, 2024· 6 min read -
Choosing the Right Vector Embedding Model for Your Generative AI Use Case
March 7, 2024· 8 min read
Latest posts
