

Deploying and Monitoring DataRobot Models on Google Cloud
This post was originally part of the DataRobot Community. Visit now to browse discussions and ask questions about DataRobot, AI Platform, data science, and more.
Introduction
DataRobot MLOps (Machine Learning Operations) is a flexible product that makes it possible to deploy, govern, and monitor ML models. Customers are not limited to serve only DataRobot models using the dedicated scalable prediction servers inside the DataRobot cluster, but have an option to deploy DataRobot models into their own Kubernetes (K8s) clusters as well. In doing so, they don’t lose all the advantages of the model monitoring provided by DataRobot’s model monitoring platform, such as service health, data drift, etc. These exportable DataRobot models are called portable prediction servers (PPSs) and are developed similar to Docker containers with all their flexibility and portability.
Unifying the portability of DataRobot model Docker images with the scalability inherent to a K8s platform results in a powerful ML solution ready for production usage.
This tutorial will guide you through the step-by-step process of DataRobot model deployment on Google Cloud, Google Kubernetes Engine (GKE).
Preliminary steps
Step 1. Check flag
The flag “Enable MMM model package export” should be enabled for your DataRobot account. (If needed, contact your administrator or DataRobot representative for more information.)
Step 2. Install Google Cloud SDK
1. Install Google Cloud SDK depending on your operating system (https://cloud.google.com/sdk/docs/quickstarts).
2. Run the following at a command prompt: gcloud init. You will be asked to choose the existing project or to create the new one and to select the compute zone.
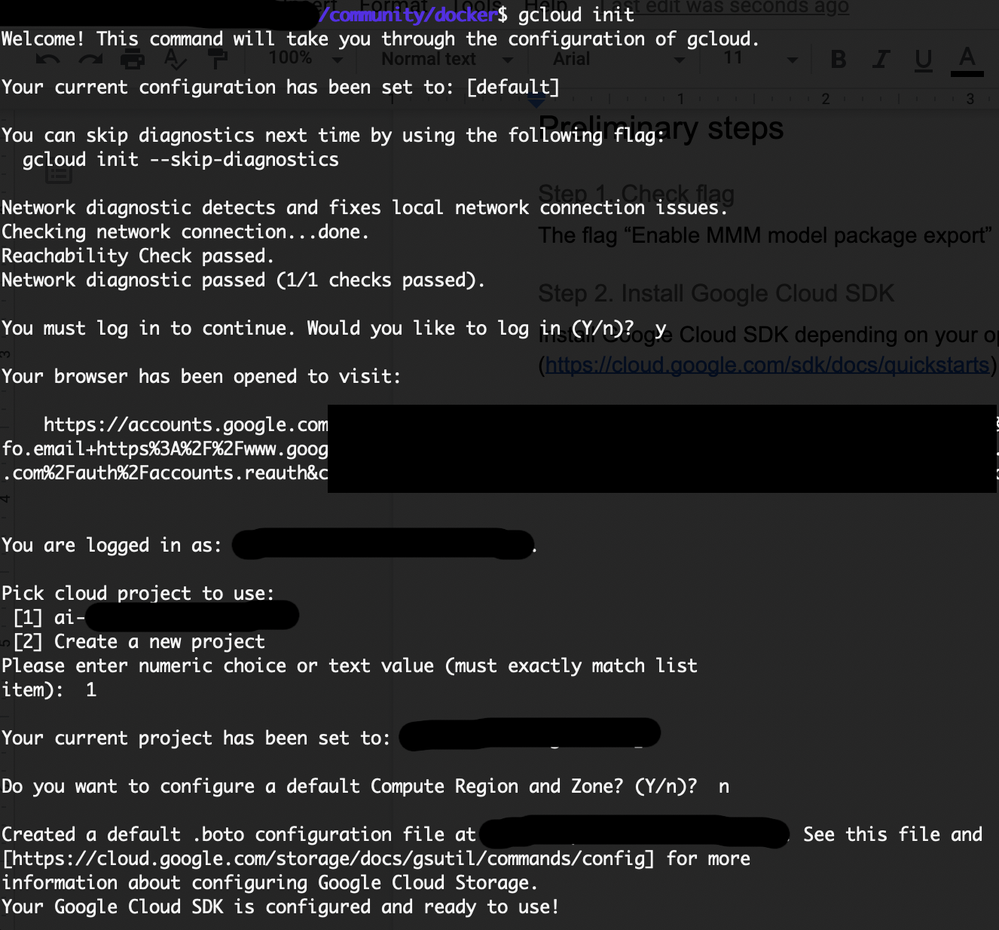 Figure1. gcloud init
3. Install Kubernetes command-line tool: gcloud components install kubectl.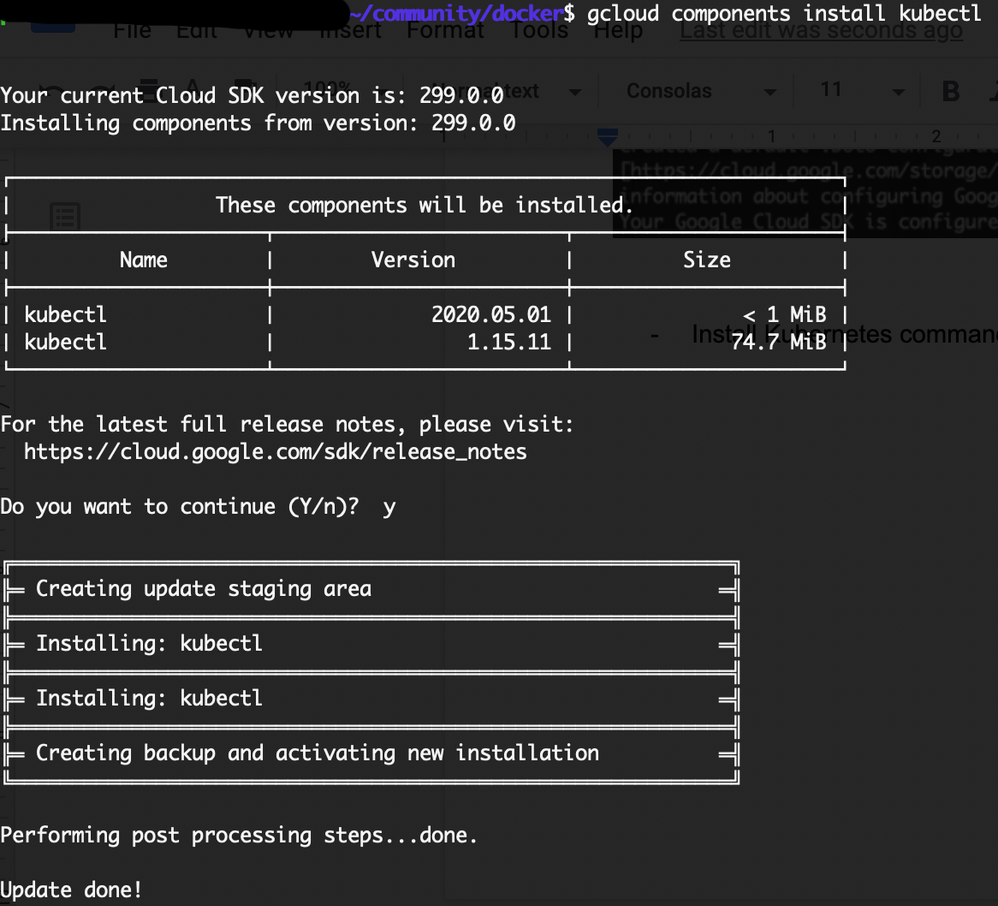 Figure 2. gcloud components install kubectl
Main steps
Step 1. Create DataRobot MLOps model package
The Kaggle housing prices dataset has been used in this tutorial. Once Autopilot finishes model building, you can create and download the MLOps model package. To do this, navigate to the Models tab. Select the model you want, and click Predict > Downloads. In the MLOps Package section, select Generate & Download.
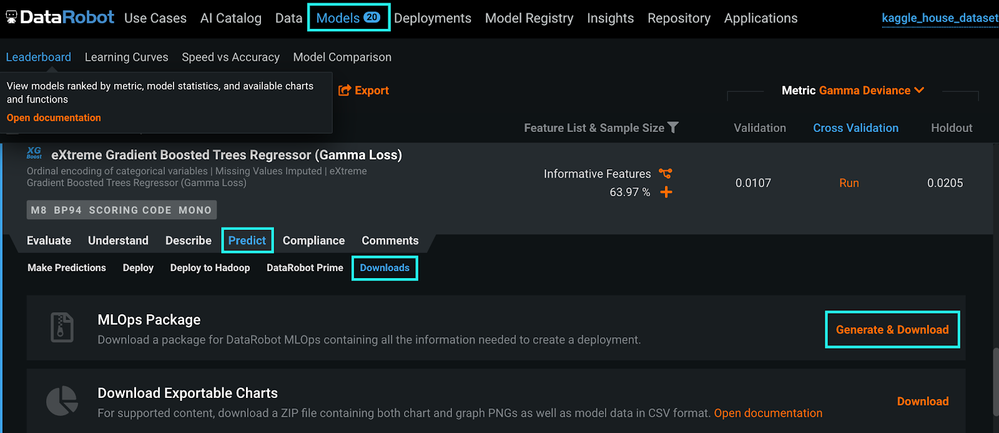 Figure 3. Generate & Download MLOps package
The model package (.mlpkg file) containing all the necessary information about the model is generated.
Step 2. Create Docker container image with MLOps package
Now you are ready to create a Docker container image.
Note: First, you need to contact DataRobot support to get more information on how you can access the PPS base image.
Once you have the PPS base image, use the following Dockerfile to generate an image that includes the DataRobot model. The .mlpkg file will be copied into the Docker image so make sure the Dockerfile and .mlpkg file are in the same folder.
 Figure 4. Dockerfile
1. Set the PROJECT_ID environment variable to your Google Cloud project ID (project-id can be set to the project id you defined during the installation of Google Cloud SDK). The PROJECT_ID variable will be used to associate the container image with your project’s Container Registry: export PROJECT_ID=ai-XXXXXX-XXXXXX
2. Build and tag the Docker image: docker build -t gcr.io/${PROJECT_ID}/house-regression-model:v1.
3. Run the docker images command to verify that the build was successful.
 Figure 5. Build was successful
The generated image will contain the DataRobot model and the monitoring agent used to transfer the metrics about service and model health back to the DataRobot MLOps platform.
Step 3. Run your Docker container image locally
This step is often considered as optional but our advice is to always test your image locally to save time and network bandwidth since the size of containers can be in the order of tens of gigabytes.
1. Run your Docker container image: docker run –rm –name house-regression -p 8080:8080 -it gcr.io/ai-XXXXXX-XXXXX/house-regression-model:v1
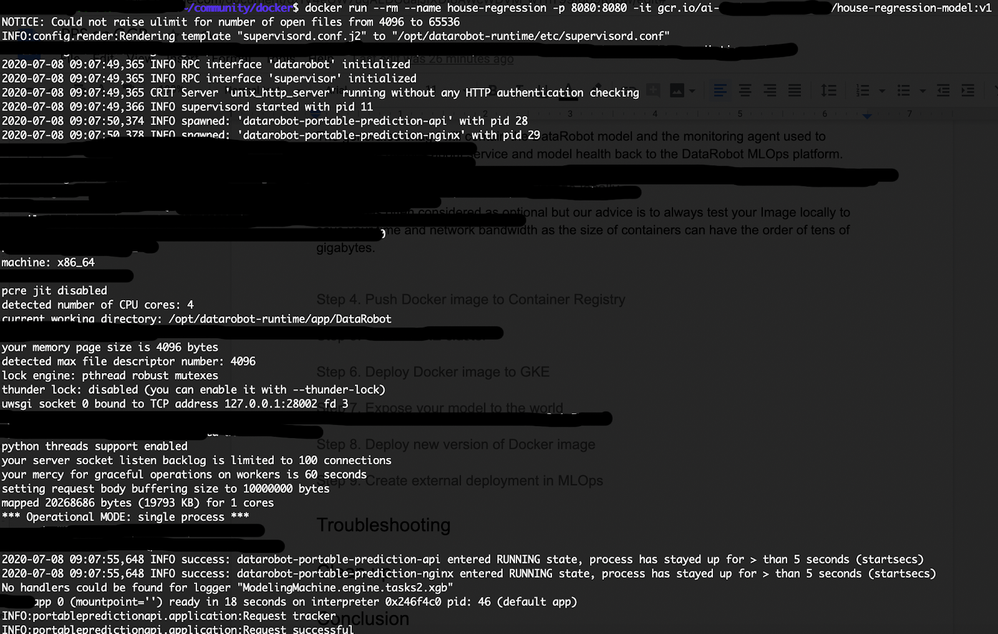 Figure 6. Run Docker container locally
2. Score your data locally to test if the model works as expected:
curl -X POST http://localhost:8080/predictions -H “Content-Type: text/csv” –data-binary @/Users/X.X/community/docker/kaggle_house_test_dataset.csv
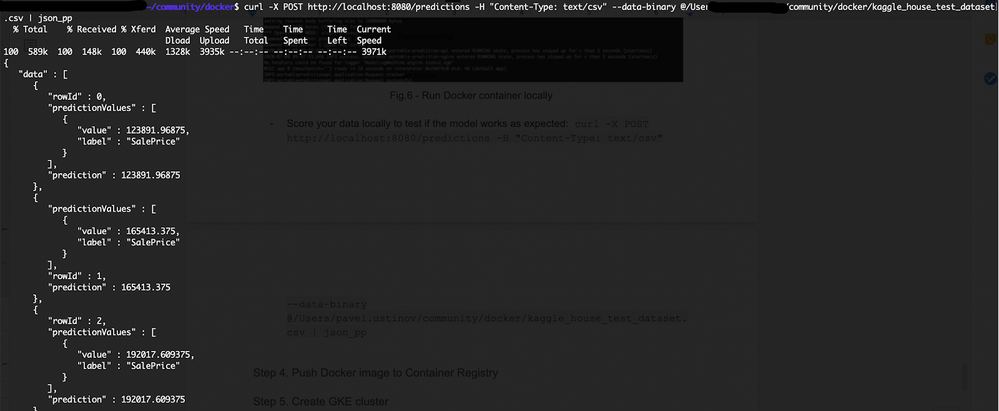 Figure 7. Score your data locally
Step 4. Push Docker image to Container Registry
You need to upload the container image to a registry so that your Google Kubernetes Engine (GKE) cluster can download and run it.
1. Configure the Docker command-line tool to authenticate to Container Registry: gcloud auth configure-docker
 Figure 8. Configure the Docker command-line tool to authenticate to Container Registry
2. Push the Docker image you just built to Container Registry: docker push gcr.io/${PROJECT_ID}/house-regression-model:v1
Note: When trying to push to the Container Registry, you may get the permission issue ‘storage.buckets.create’. If encountered, please reach out to the administrator of your GCP account.
Step 5. Create GKE cluster
Now that the Docker image is stored in Container Registry, you need to create a GKE cluster.
1. Set your project ID and Compute Engine zone options for the gcloud tool:
gcloud config set project $PROJECT_ID
gcloud config set compute/zone europe-west1-b
2. Create the cluster:
gcloud container clusters create house-regression-cluster
This command will finish as follows:
3. After the command completes, run the following command to see the cluster worker instances:
gcloud compute instances list
Note: trying to create GKE cluster you can get the following issue:
ERROR: (gcloud.container.clusters.create) ResponseError: code=400, message=The user does not have access to service account “default”. Ask a project owner to grant you the iam.serviceAccountUser role on the service account.
If encountered, please reach out to the administrator of your GCP account.
Step 6. Deploy Docker image to GKE
1. Create a Kubernetes Deployment for your Docker image:
kubectl create deployment house-regression-app –image=gcr.io/${PROJECT_ID}/house-regression-model:v1
2. Set the baseline number of Deployment replicas to 3 (i.e., Deployment will always have 3 running pods).
kubectl scale deployment house-regression-app –replicas=3
3. K8s provide the ability to manage the resources in a more flexible automatic manner. For example, you can create a HorizontalPodAutoscaler resource for your Deployment:
kubectl autoscale deployment house-regression-app –cpu-percent=80 –min=1 –max=5
4. In order to check that created pods are all operational and in a running state (e.g., you may to see up to 5 running pods as requested at the previous autoscale step), run the following command:
kubectl get pods
Output: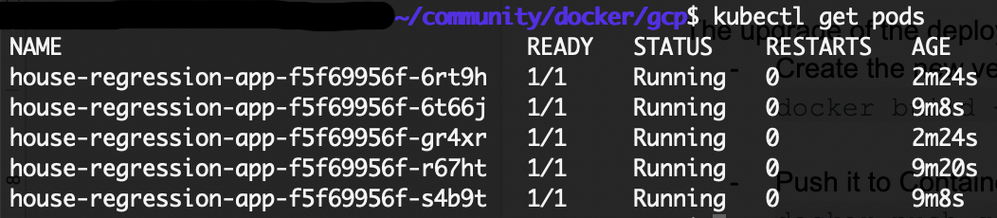
Step 7. Expose your model to the world
The default service type in GKE is called ClusterIP, where the service gets an IP address reachable only from inside the cluster. To expose a Kubernetes service outside the cluster, you will create a service of type LoadBalancer. This type of service spawns an External Load Balancer IP for a set of pods, reachable via the internet.
1. Use the kubectl expose command to generate a Kubernetes service for the house-regression-app deployment:
kubectl expose deployment house-regression-app –name=house-regression-app-service –type=LoadBalancer –port 80 –target-port 8080
–port is the port number configured on the Load Balancer
–target-port is the port number that the house-regression-app container is listening on
2. Run the following command to get the service details:
kubectl get service
Output:
3. Copy the EXTERNAL_IP address.
4. Score your model using the EXTERNAL_IP address. The cluster is open to all incoming requests at this point. K8s has more fine-grained role based access control (RBAC) that can be configured (for that information, see https://cloud.google.com/kubernetes-engine/docs/concepts/access-control).
curl -X POST http://XX.XX.XX.XX/predictions -H “Content-Type: text/csv” –data-binary @/Users/X.X/community/docker/kaggle_house_test_dataset.csv
Step 8. Create external deployment in MLOps
1. Create an external deployment in MLOps. To do this, navigate to the Model Registry tab and click Model Packages. Select Add New Package and select New external model package.
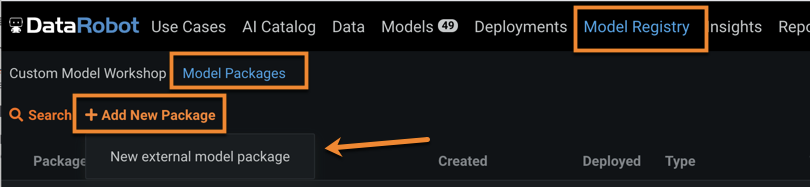
Figure 9. Create new external model package
2. Configure the external model package as shown in Figure 10. Note that target name is case-sensitive.
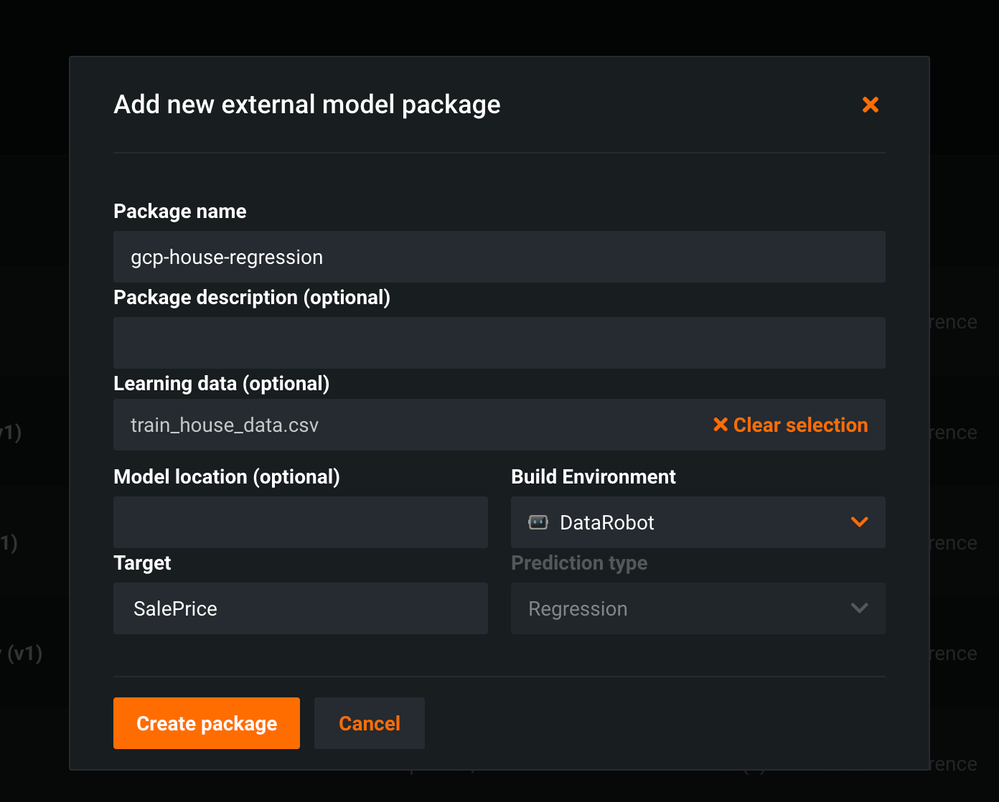 Figure 10. New external package configuration (target is case sensitive)
3. Make note of the MLOps model ID from the URL as shown in Figure 11. (You’re going to need this in Step 9, Link PPS on K8s to DataRobot MLOps.)
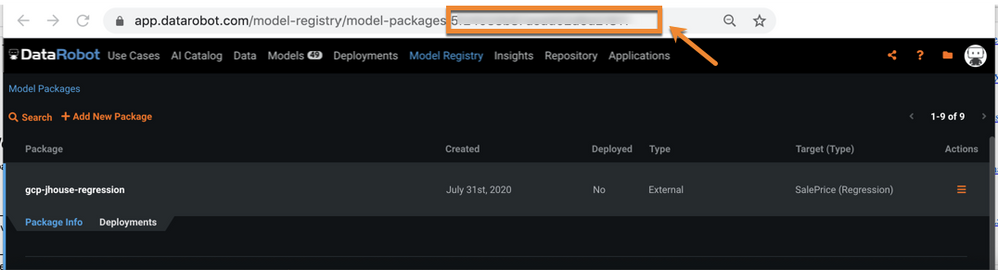 Figure 11. Get MLOps Model ID
4. Now, still in the Model Registry page select the Deployments tab (to the right of the Package Info tab) and click Create new deployment.
The Deployments page is shown with the information prefilled for the model package you created.
5. Finish the information for the deployment and click Create deployment.
6. Make note of the MLOps deployment ID from the URL as shown in Figure 12. (You’re going to need this in Step 9, Link PPS on K8s to DataRobot MLOps.)
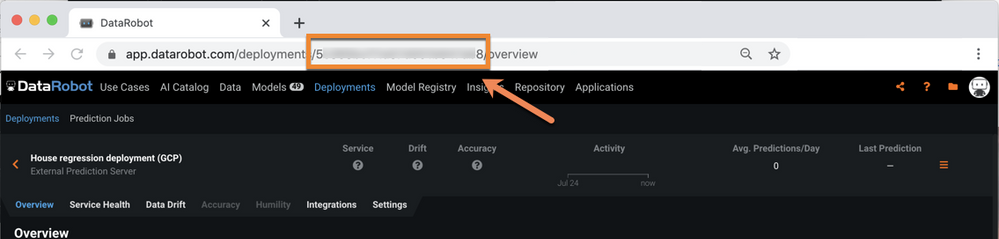 Figure 12. Get MLOps Deployment ID
Step 9. Link PPS on K8s to DataRobot MLOps
Update the K8s deployment configuration with the PPS and monitoring agent configuration. Add these environment variables into the K8s Deployment configuration (see the appendix for the complete configuration file):
PORTABLE_PREDICTION_API_WORKERS_NUMBER=2
PORTABLE_PREDICTION_API_MONITORING_ACTIVE=True
PORTABLE_PREDICTION_API_MONITORING_SETTINGS=output_type=output_dir;path=/tmp;max_files=50;file_max_size=10240000;model_id=<your mlops_model_id_obtained_at_step_8>;deployment_id=<your mlops_deployment_id_obtained_at_step_8>
MONITORING_AGENT=True
MONITORING_AGENT_DATAROBOT_APP_URL=https://app.datarobot.com/
MONITORING_AGENT_DATAROBOT_APP_TOKEN=<your token>
Step 10. Deploy new version of Docker image (optional)
Upgrading the deployed Docker image is a straightforward process.
1. Create the new version of your Docker image:
docker build -t gcr.io/${PROJECT_ID}/house-regression-model:v2
2. Push it to Container Registry:
docker push gcr.io/${PROJECT_ID}/house-regression-model:v2
3. Apply a rolling update to the existing deployment with an image update:
kubectl set image deployment/house-regression-app house-regression-model=gcr.io/${PROJECT_ID}/house-regression-model:v2
4. Watch the running pods running the v1 image terminate, and new pods running the v2 image spin up:
kubectl get pods
Clean up
1. Delete the service:
kubectl delete service house-regression-app-service
2. Delete the cluster:
gcloud container clusters delete house-regression-cluster
Conclusion
This tutorial explained how to deploy and monitor DataRobot models on the GCP platform via a Portable Prediction Server (PPS). A PPS is based on Docker containers and contains a DataRobot model with embedded monitoring agents. Using this approach, a DataRobot model is made available via a scalable deployment environment for usage, and associated data can be tracked in the centralized DataRobot MLOps dashboard with all of its monitoring and governance advantages.
Appendix. K8s Deployment and Service configuration files
Deployment configuration
apiVersion: apps/v1
kind: Deployment
metadata:
  annotations:
    deployment.kubernetes.io/revision: "2"
  creationTimestamp: "2020-07-08T12:47:27Z"
  generation: 8
  labels:
    app: house-regression-app
  name: house-regression-app
  namespace: default
  resourceVersion: "14171"
  selfLink: /apis/apps/v1/namespaces/default/deployments/house-regression-app
  uid: 2de869fc-c119-11ea-8156-42010a840053
spec:
  progressDeadlineSeconds: 600
  replicas: 5
  revisionHistoryLimit: 10
  selector:
    matchLabels:
      app: house-regression-app
  strategy:
    rollingUpdate:
      maxSurge: 25%
      maxUnavailable: 25%
    type: RollingUpdate
  template:
    metadata:
      creationTimestamp: null
      labels:
        app: house-regression-app
    spec:
      containers:
      - env:
        - name: PORTABLE_PREDICTION_API_WORKERS_NUMBER
          value: "2"
        - name: PORTABLE_PREDICTION_API_MONITORING_ACTIVE
          value: "True"
        - name: PORTABLE_PREDICTION_API_MONITORING_SETTINGS
          value: output_type=output_dir;path=/tmp;max_files=50;file_max_size=10240000;
model_id=<your_mlops_model_id>;deployment_id=<your_mlops_deployment_id>
        - name: MONITORING_AGENT
          value: "True"
        - name: MONITORING_AGENT_DATAROBOT_APP_URL
          value: https://app.datarobot.com/
        - name: MONITORING_AGENT_DATAROBOT_APP_TOKEN
          value: <your_datarobot_api_token>
        image: gcr.io/ai-XXXXXX-XXXX/house-regression-model:v1
        imagePullPolicy: IfNotPresent
        name: house-regression-model
        resources: {}
        terminationMessagePath: /dev/termination-log
        terminationMessagePolicy: File
      dnsPolicy: ClusterFirst
      restartPolicy: Always
      schedulerName: default-scheduler
      securityContext: {}
      terminationGracePeriodSeconds: 30
status:
  availableReplicas: 5
  conditions:
  - lastTransitionTime: "2020-07-08T12:47:27Z"
    lastUpdateTime: "2020-07-08T13:40:47Z"
    message: ReplicaSet "house-regression-app-855b44f748" has successfully progressed.
    reason: NewReplicaSetAvailable
    status: "True"
    type: Progressing
  - lastTransitionTime: "2020-07-08T13:41:39Z"
    lastUpdateTime: "2020-07-08T13:41:39Z"
    message: Deployment has minimum availability.
    reason: MinimumReplicasAvailable
    status: "True"
    type: Available
  observedGeneration: 8
  readyReplicas: 5
  replicas: 5
  updatedReplicas: 5
Service configuration
apiVersion: v1
kind: Service
metadata:
  creationTimestamp: "2020-07-08T12:58:13Z"
  labels:
    app: house-regression-app
  name: house-regression-app-service
  namespace: default
  resourceVersion: "5055"
  selfLink: /api/v1/namespaces/default/services/house-regression-app-service
  uid: aeb836cd-c11a-11ea-8156-42010a840053
spec:
  clusterIP: 10.31.242.132
  externalTrafficPolicy: Cluster
  ports:
  - nodePort: 30654
    port: 80
    protocol: TCP
    targetPort: 8080
  selector:
    app: house-regression-app
  sessionAffinity: None
  type: LoadBalancer
status:
  loadBalancer:
    ingress:
    - ip: XX.XX.XXX.XXX
-
How to Choose the Right LLM for Your Use Case
April 18, 2024· 7 min read -
Belong @ DataRobot: Celebrating 2024 Women’s History Month with DataRobot AI Legends
March 28, 2024· 6 min read -
Choosing the Right Vector Embedding Model for Your Generative AI Use Case
March 7, 2024· 8 min read
Latest posts
