How to Integrate DataRobot and Apache Airflow for Orchestration and MLOps Workflows
We’re excited to announce DataRobot’s integration with Apache Airflow, a popular open source orchestration tool and workflow scheduler used by more than 12,000 organizations* across industries like financial services, healthcare, retail, and manufacturing. Airflow is a perfect tool to orchestrate stages of the DataRobot machine learning (ML) pipeline, because it provides an easy but powerful solution to integrate DataRobot capabilities into bigger pipelines, combine it with other services, as well as to clean your data, and store or publish the results.
To lay a strong foundation for machine learning operations (MLOps) in your organization, it is critical that you establish a repeatable, reproducible, maintainable, and reliable ML workflow for training and deploying models and scoring predictions. Managing your ML pipeline with an orchestration solution like Apache Airflow makes it easy to monitor, debug, and rerun the individual stages of your workflow.
Integrate DataRobot and Apache Airflow for Retraining and Redeploying Models
When combined, the capabilities of DataRobot AI Platform and Apache Airflow provide a reliable solution for retraining and redeploying your models. You can, for example, retrain and redeploy your models on a schedule, on model performance degradation, or using a sensor that triggers the pipeline in presence of new data. This type of ML orchestration can provide the best-informed predictions from your organization’s models, regularly trained on the most recent data.
This tutorial will explain the DataRobot Airflow Provider setup and configuration process, helping you implement an Apache Airflow DAG (Directed Acyclic Graph) to orchestrate an end-to-end DataRobot ML pipeline. This pipeline includes creating a project, training models, deploying a model and scoring predictions.
If you are new to working with DataRobot, you’re welcome to check out our documentation, where you can find the UI docs, API docs, and tutorials.
DataRobot Provider Modules
There are multiple DataRobot operators and sensors that automate the DataRobot ML pipeline steps. Each operator initiates a specific job, and each sensor waits for a predetermined action to complete:
| Operator | Job |
CreateProjectOperator | Creates a DataRobot project and returns its ID |
TrainModelsOperator | Triggers DataRobot Autopilot to train models |
DeployModelOperator | Deploys a specified model and returns the deployment ID |
DeployRecommendedModelOperator | Deploys a recommended model and returns the deployment ID |
ScorePredictionsOperator | Scores predictions against the deployment and returns a batch prediction job ID |
AutopilotCompleteSensor | Checks whether the Autopilot has completed |
ScoringCompleteSensor | Checks whether batch scoring has completed |
Getting Started with DataRobot and Airflow
The DataRobot provider for Apache Airflow is a Python package built from source code available in a public GitHub repository and published in PyPi (The Python Package Index). It is also listed in the Astronomer Registry.
The integration uses the DataRobot Python API Client, which communicates with DataRobot instances via REST API. You’re welcome to check out the documentation to learn more about it.
For more information on using and developing providers packages, please check the Apache Airflow documentation.
Pre-requisites
The DataRobot provider for Apache Airflow requires an environment with the following dependencies installed:
- Apache Airflow >= 2.0
- DataRobot Python API Client >= 2.27.1
In this tutorial, we’ll use the Astro CLI tool to manage the local Airflow instance. Make sure to install this command line tool before following the steps below:
curl -sSL https://install.astronomer.io | sudo bash
Install the provider
First, we’ll create a new Airflow project. For that, create a new directory and run the following command inside it to initialize the project files:
astro dev init
Add the following to your requirements.txt file:
airflow-provider-datarobot
The example DataRobot pipeline DAG doesn’t appear on the DAGs page by default. To make it available, download the DAG file from the repository to the dags/ directory in your project (browse GitHub tags to download to the same source code version as your installed DataRobot provider) and refresh the page.
Run the following command to start the Airflow instance:
astro dev start
Once the installation is complete, you should be able to access Airflow (wait approx. 30 seconds for the web server to start) and login with the default credentials (username: admin, password: admin):
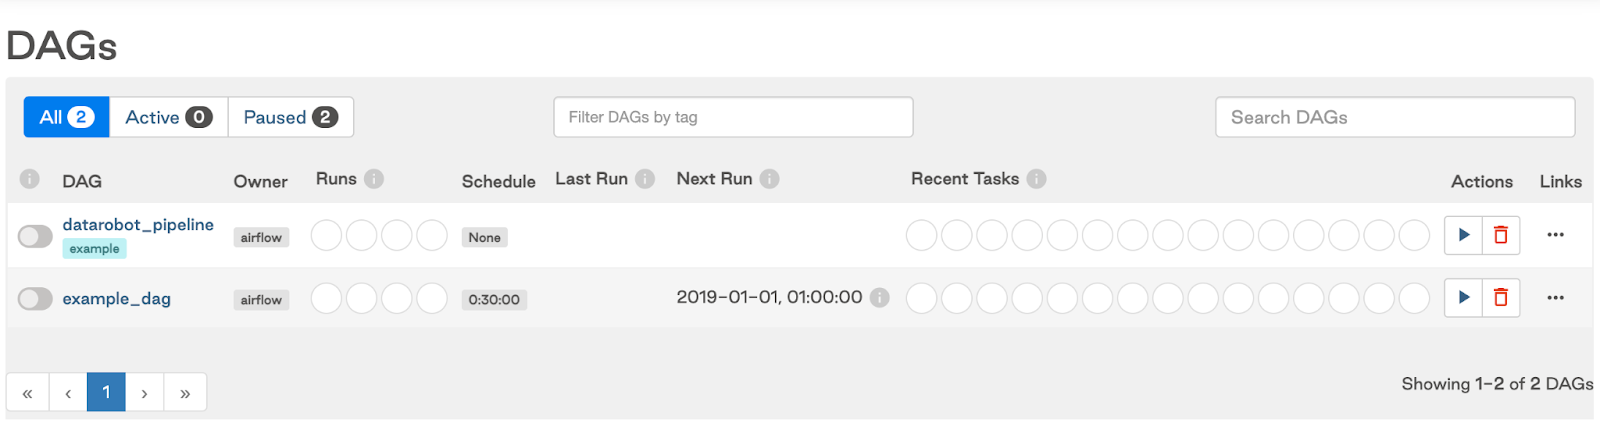
The datarobot_pipeline DAG should appear on the DAGs page:
Create a connection from Airflow to DataRobot
The next step is to create a connection from Airflow to DataRobot. Click Admin > Connections, and then, on the List Connection page, click Add a new record. Fill in the following fields:
- Connection Id: datarobot_default (this name is used by default in all operators)
- Connection Type: DataRobot
- API Key: DataRobot API token (find it in Developer Tools or create a new one)
- DataRobot endpoint URL: https://app.datarobot.com/api/v2
The connection setup page looks like this:
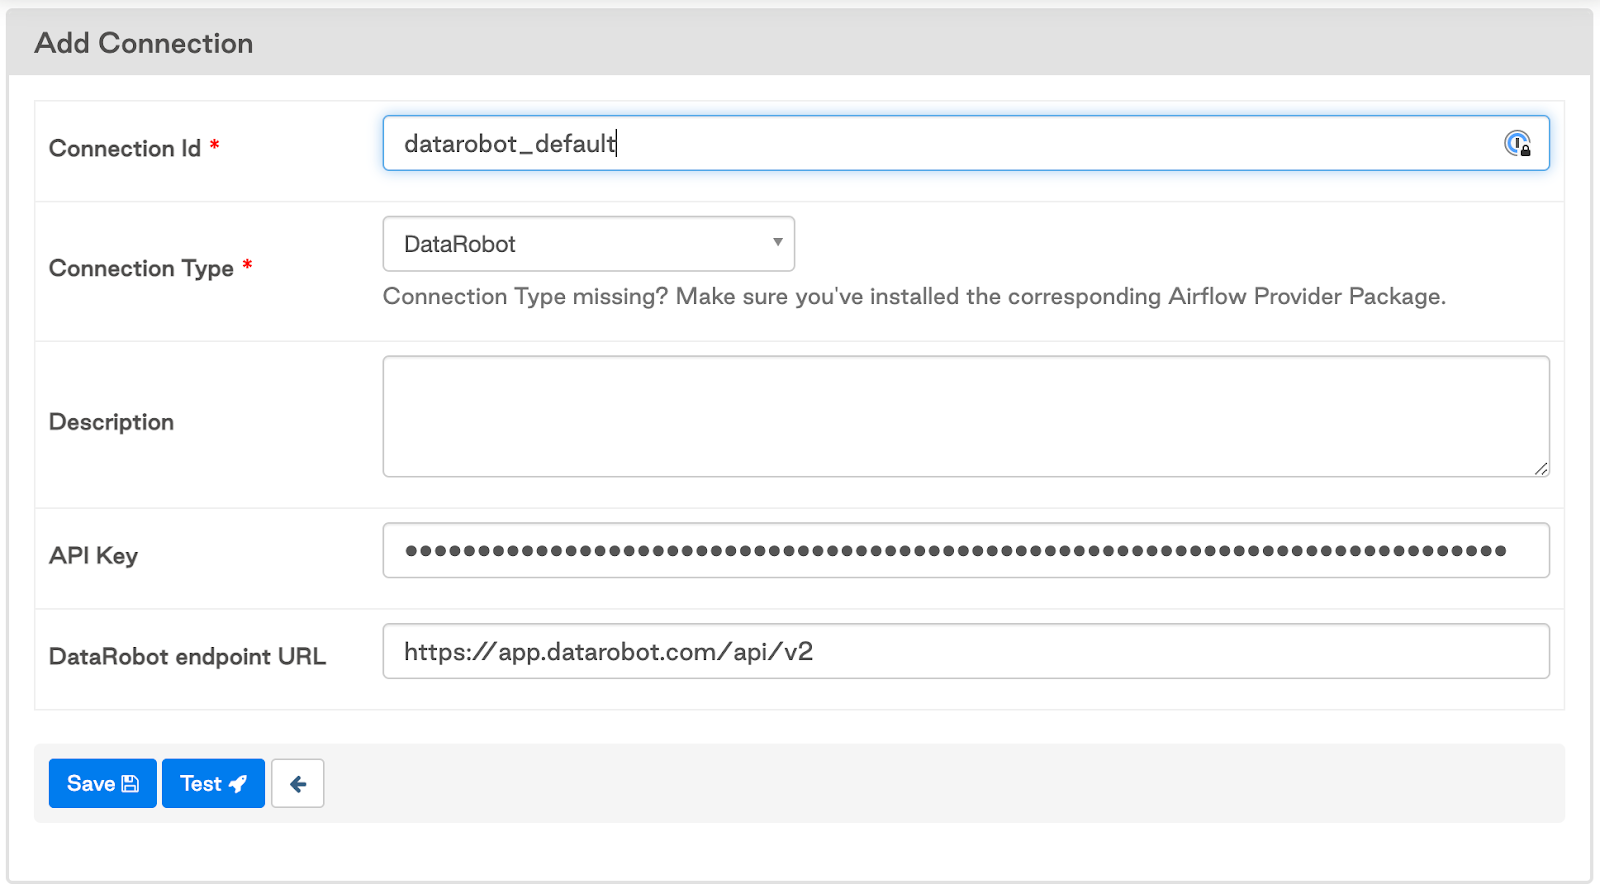
You can test the connection by clicking the Test button. Then, click the Save button.
Configuration
Each operator in the DataRobot pipeline requires specific parameters. We define these parameters in a configuration JSON file and provide it when running the DAG.
The general structure of the configuration is this:
{
    "training_data": "",
    "project_name": "Project created from Airflow - Diabetes10k",
    "unsupervised_mode": false,
    "use_feature_discovery": false,
    "autopilot_settings": {
        "target": "readmitted",
        "mode": "quick",
        "max_wait": 3600
    },
    "deployment_label": "Deployment from Airflow based on diabetes10k",
    "deployment_description": "",
    "score_settings": {}
}
Values in the training_data and score_settings depend on the intake/output type. We explain the construction of these settings in the sections below.
As all the parameters from autopilot_settings are passed directly into the Project.set_target() method, any parameter available in this method may be set in the config.
Local file intake/output
In case of the local file intake, you should provide the path to training data, e.g.:
"training_data": "include/Diabetes10k.csv"And for the scoring settings, provide the following:
    "score_settings": {
        "intake_settings": {
            "type": "localFile",
            "file": "include/Diabetes_scoring_data.csv"
        },
        "output_settings": {
            "type": "localFile",
            "path": "include/Diabetes_predictions.csv"
        }
    }
As the parameters from score_settings are passed directly into the BatchPredictionJob.score() method, any parameter available in this method may be set in the config.
If you’re using the Astro CLI tool to run Airflow, make sure to place the input files in the include/ directory which is accessible to the Airflow application inside the docker container.
Amazon AWS S3 intake/output
In case of the S3 intake, you need to generate a pre-signed URL for the training data file on S3:
- In the S3 bucket, click the csv file
- Click Object Actions at the top right corner of the screen and click Share with a pre-signed URL.
- Set the expiration time interval and click Create presigned URL. The URL is saved to your clipboard
- Paste the URL in the config file as the
training_datavalue.
For scoring data that is on AWS S3, your AWS credentials must be added to DataRobot to connect with your AWS account. You may add your credentials using the DataRobot Python API client:
import datarobot as dr

dr.client.Client(token="<your-api-token>", endpoint="https://app.datarobot.com/api/v2")

credential = dr.Credential.create_s3(
    name="My AWS credentials",
    aws_access_key_id="<aws_access_key_id>",
    aws_secret_access_key="<aws_secret_access_key>",
    aws_session_token="<aws_session_token>",
)
credential.credential_id
This credential entry appears in the DataRobot Credentials Management page (read more about credential management in our platform docs).
Afterwards, you need to add the credential.credential_id value both to intake_settings and output_settings in the config. In addition, you should provide the URLs for intake and output locations on S3:
    "score_settings": {
        "intake_settings": {
            "type": "s3",
            "url": "s3://my-bucket-name/Diabetes1k.csv",
            "credential_id": "<value from credential.credential_id>"
        },
        "output_settings": {
            "type": "s3",
            "url": "s3://my-bucket-name/Diabetes1k_predictions.csv",
            "credential_id": "<value from credential.credential_id>"
        }
    }
Run DataRobot Pipeline
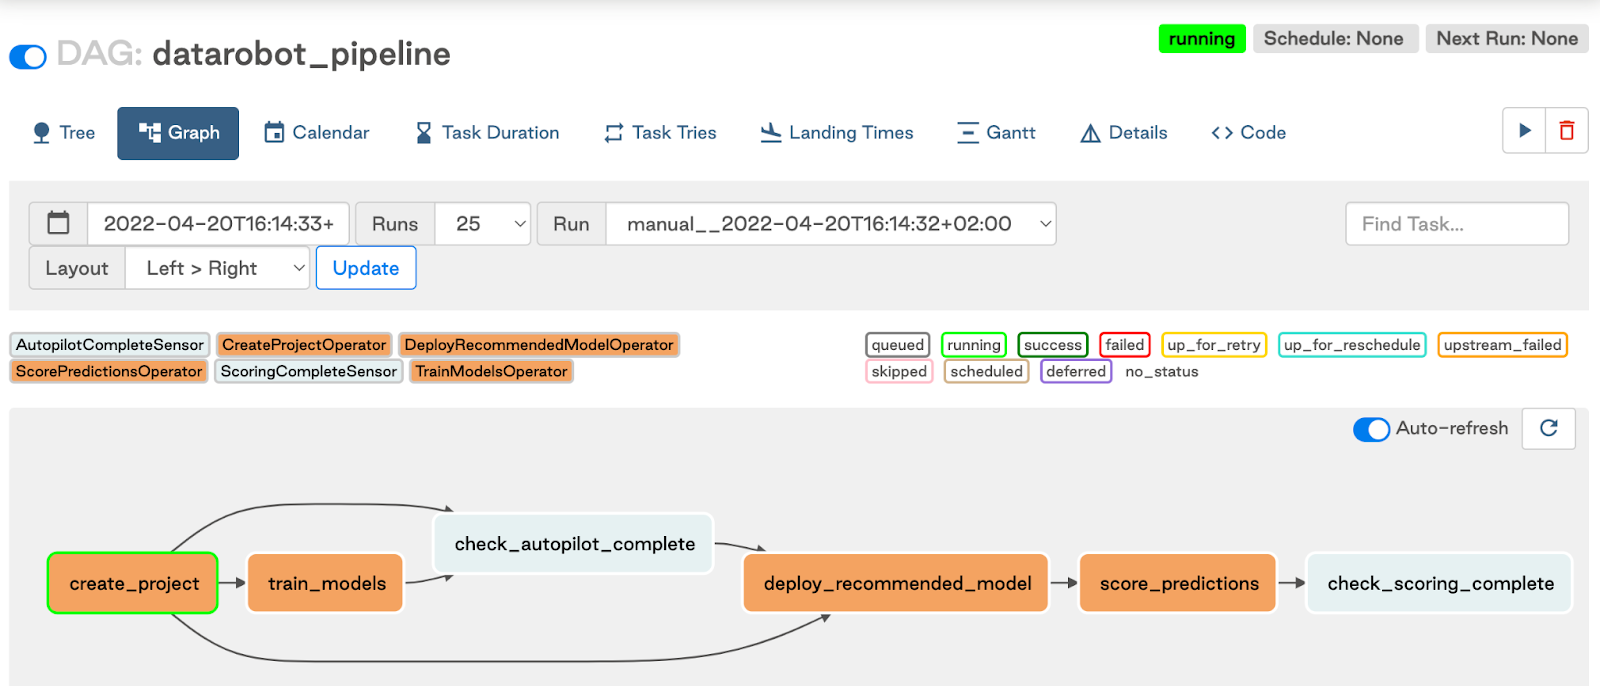
After completing all the above setup, you should be able to run the DataRobot Pipeline DAG following these steps:
- Copy the config file content.
- On the Airflow DAGs page, click the run icon in the “datarobot_pipeline” entry and select Trigger DAG w/ config.
- Paste the config.
- Select Unpause DAG when triggered.
- Click Trigger.
The graph view of the DAG looks like this:
Note: If you are running Airflow in a Docker container (e.g., using the Astro CLI tool), expect the predictions file created inside the container. To make the predictions available in the host machine, specify the output location in the include/ directory.
Getting Started with DataRobot and Airflow
DataRobot automates the capabilities to deploy, manage, monitor, and govern models in production environments. Orchestrating ML workflow takes it a step further and allows combining the ML stages within your data analytics pipeline, like data ingestion, data validation, data preparation, model evaluation, etc.
DataRobot and Airflow are the perfect tandem to achieve this level of automation in your organization and have the best MLOps experience.
References
*HG Insights, May 2022
Get Started Today.