- Blog
- AI & ML Expertise
- Scoring Snowflake Data via DataRobot Models on AWS EMR Spark
Scoring Snowflake Data via DataRobot Models on AWS EMR Spark
This post was originally part of the DataRobot Community. Visit now to browse discussions and ask questions about the DataRobot AI Platform, data science, and more.
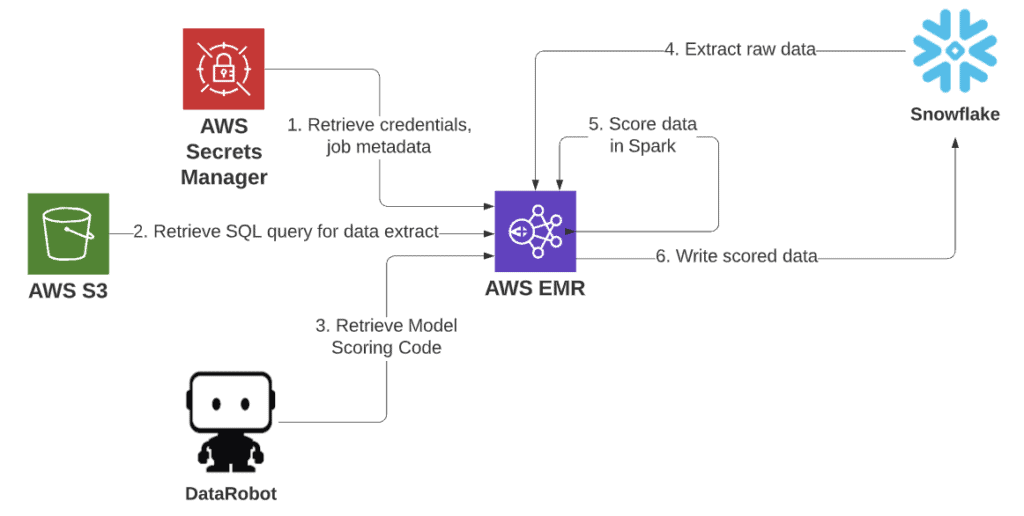
This article will cover a machine learning model scoring pipeline using exportable scoring code from DataRobot to score millions of records on Spark, with the data source and target both being the Snowflake database. It can be used as a template to modify and create various Spark scoring jobs with different sources and targets.
Technologies Used In This Article
AWS EMR, Apache Spark
Apache Spark is an open source cluster computing framework. It is considered to be in the “Big Data” family of technologies for working with large volumes of data in structured or semi-structured forms, in streaming or in batch modes. It does not have its own persistent storage layer, and relies on file systems like HDFS, object storage like AWS S3, or databases through JDBC interfaces for data.
Popular Spark platforms include Databricks and AWS Elastic Map Reduce (EMR); for the purpose of this article, EMR will be used. This is a Spark (and Hadoop) cluster that can be spun up as needed for work and shut down when work is completed.
AWS S3
S3 is the object storage service of AWS. It will be used in the documented example as follows, as a place to store and retrieve the job’s database query dynamically. S3 can be written to as a job completion target as well. In addition, cluster log files will be written to S3.
AWS Secrets Manager
Hardcoding credentials may be done during development or for ad-hoc jobs, although as a best practice it is ideal, even in development, to score these in a secure fashion. This is a requirement for safely protecting them in production scoring jobs. The Secrets Manager service will allow only trusted users or roles to be able to access securely stored secret information.
AWS Command Line Interface (CLI)
For brevity and ease of use, the AWS CLI will be used to perform command line operations for several activities related to AWS activities throughout this article. These activities could also be performed manually via the GUI. See Amazon for more information on configuring the CLI.
Snowflake Database
Snowflake is a cloud-based database platform designed for data warehouse and analytic workloads. It allows for easy scale-up and scale-out capabilities for working on large data volume use cases and is available as a service across all major cloud platforms. For this scoring example Snowflake is the source and target, although both can be swapped for other databases or storage platforms for Spark scoring jobs.
DataRobot Scoring Code
Models in DataRobot can quickly and easily be deployed for API hosting within the platform. In some cases rather than bringing the data to the model in the API, there may be benefits to bringing the model to the data. One of these reasons is very large scoring jobs. The example that follows will score three million Titanic passengers for survival probability from an enlarged Kaggle dataset. Although not typically an amount that would warrant considering using Spark over the API, here it serves as a good technical demonstration.
Models in DataRobot can be exported in Java or Python as a rules-based approximation with DataRobot Prime. A second export option is Scoring Code (Codegen), which provides source code and a compiled Java binary JAR which holds the exact model chosen.
Programming Languages
Structured Query Language (SQL) will be used for the database, Scala for Spark. Python/PySpark could also be leveraged for running jobs on Spark.
Architecture
Development Environment
AWS EMR includes a Zeppelin Notebook service, which allows for interactive development of Spark code. To set up a development environment, first create an EMR cluster. Initial creation can be done via GUI options on AWS and defaults are acceptable. Be sure to choose the “Spark” option. Note the advanced settings allow for more granular choices of software installation.
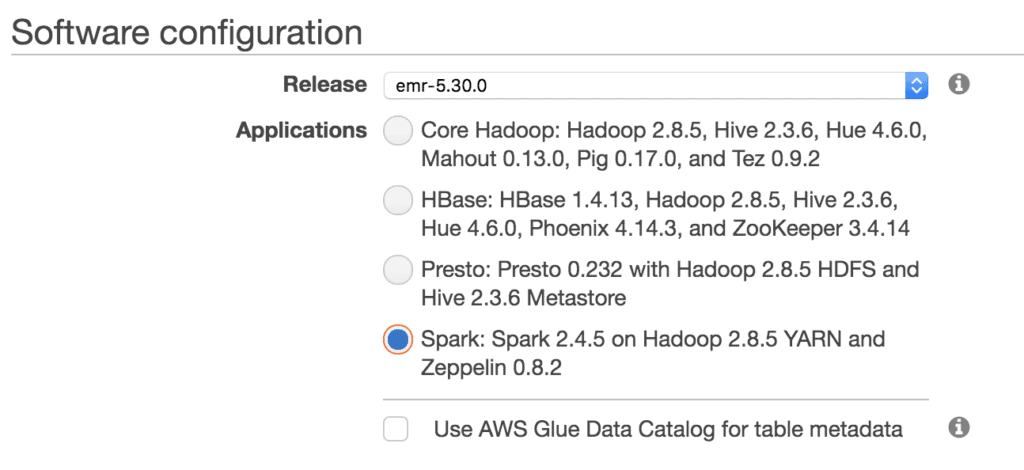
Upon successful creation, when viewing the Summary tab on the cluster the AWS CLI export button will provide a CLI script to recreate the instance, which can be saved and edited for the future. An example is as follows:
aws emr create-cluster \
–applications Name=Spark Name=Zeppelin \
–configurations ‘[{“Classification”:”spark”,”Properties”:{}}]’ \
–service-role EMR_DefaultRole \
–enable-debugging \
–release-label emr-5.30.0 \
–log-uri ‘s3n://mybucket/emr_logs/’ \
–name ‘Dev’ \
–scale-down-behavior TERMINATE_AT_TASK_COMPLETION \
–region us-east-1 \
–tags “owner=doyouevendata” “environment=development” “cost_center=comm” \
–ec2-attributes ‘{“KeyName”:”creds”,”InstanceProfile”:”EMR_EC2_DefaultRole”,”SubnetId”:”subnet-0e12345″,”EmrManagedSlaveSecurityGroup”:”sg-123456″,”EmrManagedMasterSecurityGroup”:”sg-01234567″}’ \
–instance-groups ‘[{“InstanceCount”:1,”EbsConfiguration”:{“EbsBlockDeviceConfigs”:[{“VolumeSpecification”:{“SizeInGB”:32,”VolumeType”:”gp2″},”VolumesPerInstance”:2}]},”InstanceGroupType”:”MASTER”,”InstanceType”:”m5.xlarge”,”Name”:”Master Instance Group”},{“InstanceCount”:2,”EbsConfiguration”:{“EbsBlockDeviceConfigs”:[{“VolumeSpecification”:{“SizeInGB”:32,”VolumeType”:”gp2″},”VolumesPerInstance”:2}]},”InstanceGroupType”:”CORE”,”InstanceType”:”m5.xlarge”,”Name”:”Core Instance Group”}]’
Connectivity details about the cluster can be found in the GUI. Log on to the server to provide additional configuration items. A terminal can be accessed via SSH; this will require that a public-facing IP or DNS address is available, and that the VPC inbound ruleset applied to the EC2 cluster master instance allows incoming connections over SSH port 22. If connectivity is refused because the machine is unreachable, add source IP/subnets to the security group.
ssh -i ~/creds.pem hadoop@ec2-54-121-207-147.compute-1.amazonaws.com
Several packages will be used to support database connectivity and model scoring. These JARs can be loaded to cluster nodes when the cluster is created to have them available in the environment. They can also be compiled into JARs for job submission, or they can be downloaded from a repository at run time. It is the last option that will be taken advantage of for this example.
The AWS environment used in this article is based on EWS EMR 5.30 with Spark 2.11. Some changes may be necessary to follow along as new versions of referenced environments and packages are released. In addition to those already provided by AWS, two Snowflake and two DataRobot packages will be used:
spark-snowflake
snowflake-jdbc
scoring-code-spark-api
datarobot-prediction
To leverage these in the Zeppelin notebook environment, the zeppelin-env file can be edited to add the packages when the interpreter is invoked. Edit this file on the master node.
sudo vi /usr/lib/zeppelin/conf/zeppelin-env.sh
Edit the export SPARK_SUBMIT_OPTIONS line at the bottom of the file and add the packages flag to the string value.
–packages net.snowflake:snowflake-jdbc:3.12.5,net.snowflake:spark-snowflake_2.11:2.7.1-spark_2.4,com.datarobot:scoring-code-spark-api_2.4.3:0.0.19,com.datarobot:datarobot-prediction:2.1.4
If further edits are made to this file while one is working in Zeppelin, the interpreter within the Zeppelin environment will need to be restarted for them to take effect.
An SSH tunnel can now be established to access the remote Zeppelin server from a local browser. The following command will forward port 8890 on the master node to the local machine. Without using a public DNS entry, additional proxy configuration may be required. This statement leverages “Option 1” in the following article; a proxy for the second option as well as additional ports and services can be found here.
ssh -i ~/creds.pem -L 8890:ec2-54-121-207-147.compute-1.amazonaws.com:8890 hadoop@ec2-54-121-207-147.compute-1.amazonaws.com -Nv
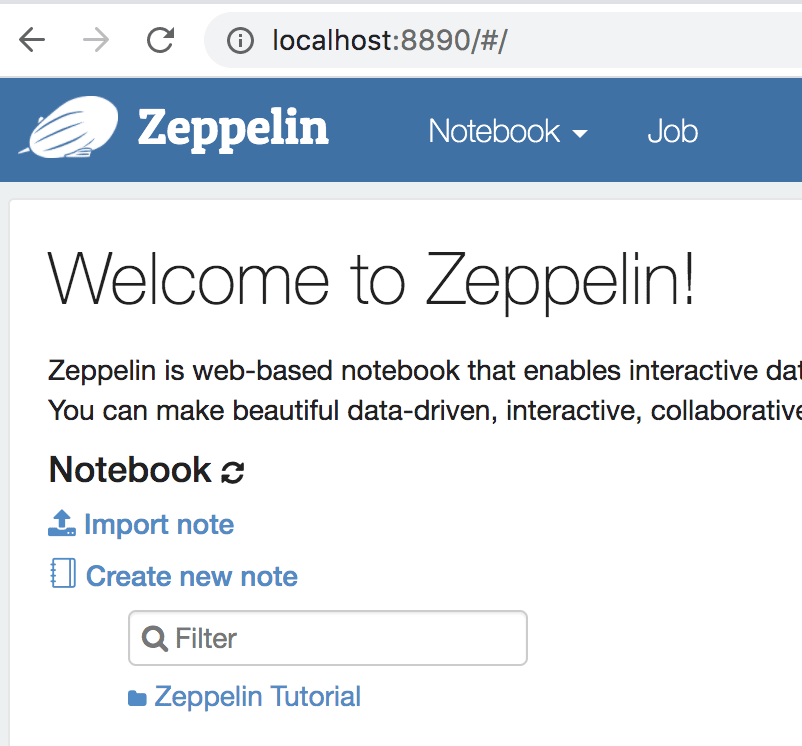
Navigating to port 8890 on the local machine now brings up the Zeppelin instance where a new note can be created along with the packages, as defined in the environment shell script.
Several helper tools are provided on GitHub to aid in quickly and programmatically performing this process (and others described in this article) via the AWS CLI from a local machine.
env_config.sh contains AWS environment variables, such as profile (if used), tags, VPCs, security groups, and other elements used in specifying a cluster.
snow_bootstrap.sh is an optional file to perform tasks on the EMR cluster nodes after they are allocated, but before applications like Hadoop and Spark are installed.
create_dev_cluster.sh uses the above to create a cluster and provides connectivity strings. It takes no arguments.
Creating Secrets
Credentials can be coded into variables during development, although this article will demonstrate how to create a production EMR job with auto-termination upon completion. It is a good practice to store secret values such as database usernames and passwords in a trusted environment. In this case, the IAM Role applied to the EC2 instances has been granted the privilege to interact with the AWS Secrets Manager service.
The simplest form of a secret contains a string reference name and a string of values to store. The process for creating one is straightforward in the AWS GUI and will guide the creation of a secret, with a string representing provided keys and values in JSON. Some helper files are available to do this with the CLI.
secrets.properties is a JSON list of secrets to store.
Example contents:
{
"dr_host":"https://app.datarobot.com",
"dr_token":"N1234567890",
"dr_project":"5ec1234567890",
"dr_model":"5ec123456789012345",
"db_host":"dp12345.us-east-1.snowflakecomputing.com",
"db_user":"snowuser",
"db_pass":"snow_password",
"db_db":"TITANIC",
"db_schema":"PUBLIC",
"db_query_file":"s3://bucket/ybspark/snow.query",
"db_output_table":"PASSENGERS_SCORED",
"s3_output_loc":"s3a://bucket/ybspark/output/",
"output_type":"s3"
}
create_secrets.sh is a script which leverages the CLI to create (or update) the secret name specified within the script with the properties file.
Source SQL Query
Instead of putting a SQL extract statement into the code, instead it can be provided dynamically at runtime. It is not necessarily a secret and, given its potential length and complexity, it fits better as simply a file in S3. One of the secrets is pointing to this location, the db_query_file entry. The contents of this file on S3—s3://bucket/ybspark/snow.query—is simply a SQL statement against a table with three million passenger records:
select * from passengers_3m
Spark Code (Scala)
With supporting components in place, code to construct the model scoring pipeline can begin. It can be run on a spark-shell instance directly on the machine, with a helper to include the necessary packages with run_spark-shell.sh and spark_env.sh. This interactive session may assist in some quick debugging, but it only uses the master node and is not a friendly environment to iterate code development in. The Zeppelin notebook is a more friendly environment to do so in and runs the code in yarn-cluster mode, leveraging the multiple worker nodes available. The code below can be copied or the note can simply be imported from the snowflake_scala_note.json in the GitHub repo for this project.
First, import package dependencies.
import org.apache.spark.sql.functions.{col}
import org.apache.spark.sql.{DataFrame, Dataset, SparkSession}
import org.apache.spark.sql.SaveMode
import java.time.LocalDateTime
import com.amazonaws.regions.Regions
import com.amazonaws.services.secretsmanager.AWSSecretsManagerClientBuilder
import com.amazonaws.services.secretsmanager.model.GetSecretValueRequest
import org.json4s.{DefaultFormats, MappingException}
import org.json4s.jackson.JsonMethods._
import com.datarobot.prediction.spark.Predictors.{getPredictorFromServer, getPredictor}
Create some helper functions to assist in making the process easier.
	/* get secret string from secrets manager */
	def getSecret(secretName: String): (String) = {

		val region = Regions.US_EAST_1

		val client = AWSSecretsManagerClientBuilder.standard()
			.withRegion(region)
			.build()

		val getSecretValueRequest = new GetSecretValueRequest()
			.withSecretId(secretName)

		val res = client.getSecretValue(getSecretValueRequest)
		val secret = res.getSecretString

		return secret
	}

	/* get secret value from secrets string once provided key */
	def getSecretKeyValue(jsonString: String, keyString: String): (String) = {

		implicit val formats = DefaultFormats
        val parsedJson = parse(jsonString)
		val keyValue = (parsedJson \ keyString).extract[String]
		return keyValue
	}

	/* run sql and extract sql into spark dataframe */
	def snowflakedf(defaultOptions: Map[String, String], sql: String) = {

		val spark = SparkSession.builder.getOrCreate()

		spark.read
		.format("net.snowflake.spark.snowflake")
		.options(defaultOptions)
		.option("query", sql)
		.load()
	}
Step 1: Retrieve and parse secrets data stored in AWS to support the scoring job.
		val SECRET_NAME = "snow/titanic"

		printMsg("db_log: " + "START")
		printMsg("db_log: " + "Creating SparkSession...")
		val spark = SparkSession.builder.appName("Score2main").getOrCreate();

		printMsg("db_log: " + "Obtaining secrets...")
		val secret = getSecret(SECRET_NAME)

		printMsg("db_log: " + "Parsing secrets...")
		val dr_host = getSecretKeyValue(secret, "dr_host")
		val dr_project = getSecretKeyValue(secret, "dr_project")
		val dr_model = getSecretKeyValue(secret, "dr_model")
		val dr_token = getSecretKeyValue(secret, "dr_token")
		val db_host = getSecretKeyValue(secret, "db_host")
		val db_db = getSecretKeyValue(secret, "db_db")
		val db_schema = getSecretKeyValue(secret, "db_schema")
		val db_user = getSecretKeyValue(secret, "db_user")
		val db_pass = getSecretKeyValue(secret, "db_pass")
		val db_query_file = getSecretKeyValue(secret, "db_query_file")
		val output_type = getSecretKeyValue(secret, "output_type")
Step 2: Read the query into a variable from the query hosted on S3 specified in db_query_file.
		printMsg("db_log: " + "Retrieving db query...")
		val df_query = spark.read.text(db_query_file)
		val query = df_query.select(col("value")).first.getString(0)
Step 3: Retrieve the scoring code for the model from DataRobot. Although this can be done from a local JAR, the code here leverages retrieving it from DataRobot on the fly. This model can be easily swapped out for another by changing the dr_model value referenced in the secrets.
		printMsg("db_log: " + "Loading Model...")
		val spark_compatible_model = getPredictorFromServer(host=dr_host, projectId=dr_project, modelId=dr_model, token=dr_token)
Step 4: Run the SQL retrieved against the database and bring it into a Spark dataframe.
		printMsg("db_log: " + "Extracting data from database...")
		val defaultOptions = Map(
			"sfURL" -> db_host,
			"sfAccount" -> db_host.split('.')(0),
			"sfUser" -> db_user,
			"sfPassword" -> db_pass,
			"sfDatabase" -> db_db,
			"sfSchema" -> db_schema
		)

		val df = snowflakedf(defaultOptions, query)
Step 5: Score the dataframe through the retrieved DataRobot model. The example below creates a subset of the output containing just the identifying column (Passenger ID) and the probability towards the positive class label 1, i.e., the probability of survival for the passenger.
		printMsg("db_log: " + "Scoring Model...")
		val result_df = spark_compatible_model.transform(df)

		val subset_df = result_df.select("PASSENGERID", "target_1_PREDICTION")
		subset_df.cache()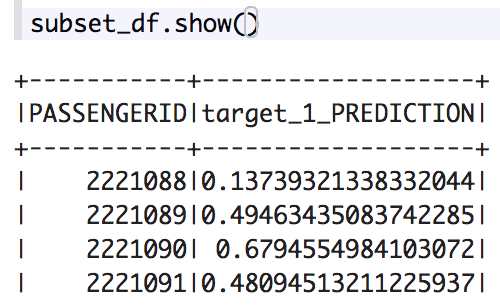
Step 6: Write the results. The value output_type dictates whether the scored data is written back to a table in the database or a location in S3.
		if(output_type == "s3") {
			val s3_output_loc = getSecretKeyValue(secret, "s3_output_loc")
			printMsg("db_log: " + "Writing to S3...")
			subset_df.write.format("csv").option("header","true").mode("Overwrite").save(s3_output_loc)
		}
		else if(output_type == "table") {
			val db_output_table = getSecretKeyValue(secret, "db_output_table")
			subset_df.write
                .format("net.snowflake.spark.snowflake")
                .options(defaultOptions)
                .option("dbtable", db_output_table)
                .mode(SaveMode.Overwrite)
                .save()
		}
		else {
			printMsg("db_log: " + "Results not written to S3 or database; output_type value must be either 's3' or 'table'.")
		}

		printMsg("db_log: " + "Written record count - " + subset_df.count())
		printMsg("db_log: " + "FINISH")
That’s it! This approach works well for development and manual or ad-hoc scoring needs. The EMR cluster can be terminated when all work is complete. AWS EMR can also be leveraged to create routinely run production jobs on a schedule as well.
Productionalizing the Pipeline
A production job can be created to run this job on regular intervals. The process of creating an EMR instance is similar; however, the instance will be set to run some job steps after it comes online. After the steps are completed, the cluster will be automatically terminated as well.
The Scala code however cannot be run as a scripted step. It must be compiled into a JAR for submission. The open source build tool sbt is used for compiling Scala and Java code. In the repo, sbt was installed already (using commands in the snow_bootstrap.sh script). Note this is only required for development to compile the JAR and could be removed from any production job run. Although the code does not need to be developed on the actual EMR master node, it does present a good environment to develop in that is where the code will ultimately be run. The main files of interest in the project are:
snowscore/build.sbt
snowscore/create_jar_package.sh
snowscore/spark_env.sh
snowscore/run_spark-submit.sh
snowscore/src/main/scala/com/comm_demo/SnowScore.scala
- build.sbt contains the prior referred to packages for Snowflake and DataRobot, and includes two additional packages for working with AWS resources.
- create_jar_package.sh, spark_env.sh, and run_spark-submit.sh are all helper functions. The first function simply runs a clean package build of the project, and the latter two functions allow for submission to the spark cluster of the built package JAR simply from the command line.
- SnowScore.scala contains the same code referenced above, arranged in a main class to be called when submit to the cluster for execution.
Run the create_jar_package.sh to create the output package JAR; which simply calls sbt clean and sbt package. This will create the JAR ready for job submission, target/scala-2.11/score_2.11-0.1.0-SNAPSHOT.jar.
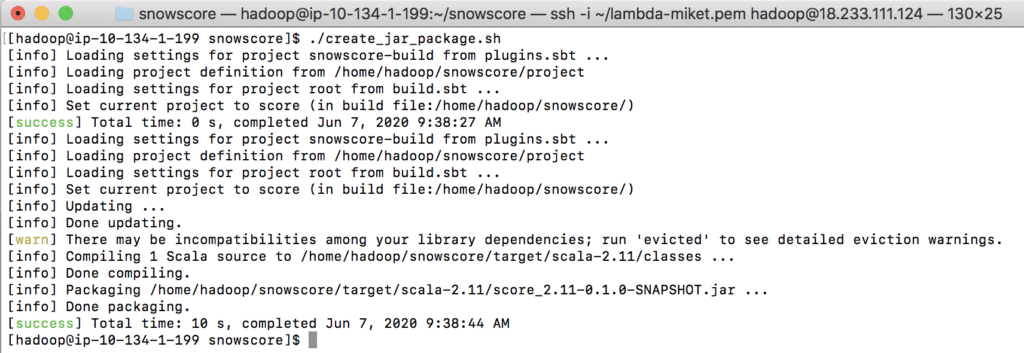
The JAR can be submitted with the run_spark-submit.sh script; however, to use it in a self-terminating cluster it will need to be hosted on S3. In this example it has been copied over to s3://bucket/ybspark/score_2.11-0.1.0-SNAPSHOT.jar. If on a development EMR instance, after the JAR has been copied over to S3 the instance can be terminated.
Lastly, the run_emr_prod_job.sh script can be run to call an EMR job using the AWS CLI to create an EMR instance, run a bootstrap script, install necessary applications, and execute a step function to call the main class of the S3 hosted package JAR. The –steps argument in the script creates the step to call the spark-submit job on the cluster. Note the –packages submit at runtime, the snapshot JAR, and the main class that are specified in this attribute. Upon completion of the JAR, the EMR instance will self-terminate.
The production job creation is now complete. This may be run by various triggers or scheduling tools. By updating the snow.query file hosted on S3, the input can be modified; in addition, the output targets of tables in the database or object storage on S3 can also be modified. Different machine learning models from DataRobot can easily be swapped out as well, with no additional compilation or coding required to make any of these changes.
Performance/Costs
Consider as reference: my MacBook contains a i5-7360U CPU @ 2.30GHz and a local (default option) scoring code CSV job scored at a rate of 5,660 rec/s. When using a system with m5.xlarge (4 vCPU 16GB RAM) for MASTER and CORE EMR nodes, running a few tests from 3 million to 28 million passenger records ran from 12,000–22,000 rec/s per CORE node.
There is startup time required to construct an EMR cluster; this varies and takes 7+ minutes. There is additional overhead in simply running a Spark job. Scoring 418 records on a 2-CORE node system through the entire pipeline took 512 seconds total. However, scoring 28 million on a 4-CORE node system took 671 seconds total. Pricing, another consideration, is based on instance hours for EC2 compute and EMR services.
Examination of the scoring pipeline job alone as coded, without any tweaks to code, shows Spark, or EMR, scaling of 28 million records—from 694 seconds on 2 CORE nodes to 308 seconds on 4 CORE nodes.
AWS EMR cost calculations can be a bit challenging due to the way they are measured with normalized instance hours and when the clock starts ticking for cluster payment. A GitHub project is available to create approximate costs for resources over a given time period or when given a specific cluster-id. This project can be found on GitHub here.
An estimate for the 28 million passenger scoring job with 4 CORE servers is as follows:
$ ./aws-emr-cost-calculator cluster –cluster_id=j-1D4QGJXOAAAAA
CORE.EC2 : 0.16
CORE.EMR : 0.04
MASTER.EC2 : 0.04
MASTER.EMR : 0.01
TOTAL : 0.25
As scoring pipelines may contain additional pre- and post-processing steps, it is best to use this tool with various cluster options to determine cost vs. performance optimizations for each scoring pipeline constructed on a use case-by-use case basis.
Related code for this article can be found on DataRobot Community GitHub.
For more details go to DataRobot Public Documentation > Intake options > Snowflake scoring

Community Manager
-
How to Choose the Right LLM for Your Use Case
April 18, 2024· 7 min read -
Belong @ DataRobot: Celebrating 2024 Women’s History Month with DataRobot AI Legends
March 28, 2024· 6 min read -
Choosing the Right Vector Embedding Model for Your Generative AI Use Case
March 7, 2024· 8 min read
Latest posts
Related Posts

You’ve just successfully subscribed


